
Before we get into the making of the stays I need to be real with you. I kept this project a secret for over two months because I was really afraid I was going to end up embarrassing myself. I kept asking myself “Am I really doing this? This is all new. This is complicated.” Even as I was fabric hunting and researching I kept having a vision of this project turning into a wreck, a sad mess of fabric that would sit unfinished guilting me from a corner for the rest of my days. I usually share things I’m excited about social media, but I was worried that I would share something and then have someone ask about it “Hey, how’s that costume coming along?” …and have to admit that I’d f-ed it up beyond recognition and abandoned it in shame and frustration.
Because it’s happened before—although no one found out. I shared a work-in-progress on Instagram, right before making a huge mistake. In my eagerness to get more done during naptime I miscut the batting for an easy whole cloth “quilt” and well, once fabric is cut, there’s no undo button! My batting was too large and I was supposed to trim it down, except I forgot that I had measured and marked when it was folded in half. YUP. I had extra batting, and somehow managed to make it too small to use. The only option was to buy more batting, and I was crushed that I’d made such a stupid error before getting the part I was nervous about trying in the first place—the quilting! I decided to only share finished or almost-finished projects after that.
Guess what? Surprise, I made more mistakes! But tackling them and problem-solving gave me confidence, instead of draining it. I’m self-taught and felt I didn’t have any sort of authority to share my work with others. I am still nervous about zippers. I don’t have a dress form or a dedicated sewing studio. I don’t have a degree in theatrical costuming or art history. I’m terrible at hand-sewing and don’t even know all the stitches used in historically accurate gowns. Don’t let your current skill set be your ONLY skill set. You just have to start. I hope if that you’re interested in sewing this project will prove that if I can do it, so can you!
The Stays

“the shoulder blades were thus permanently pulled back to give the fashionable narrow straight back… These stays do not unduly compress the waist.”
Unlike a Victorian corset with an extreme hourglass shape and little regard for a woman’s internal organs and indulgences like breathing!
I don’t have my early process photos because my phone met with a series of unfortunate events and I lost all my back up data. (The absolute worst. We will not speak of it further…)
You’ll need to measure yourself and cut out the appropriate size pattern. Then pin it and cut out your main fabric, which you’ll see on the outside, and your thicker interlining or strength layer which could be the traditional corsetry fabric coutil or linen or cotton canvas. Coutil is very expensive, and cotton canvas is similar to what would have been used so I purchased an all natural canvas duck. Natural fiber fabrics really are a must because you don’t want to be stuck sweating in polyester stays that don’t breathe! Upholstery fabric is popular for the main fabric because of the weight and designs, but so much of what I found was 100% polyester. Since you only need 1yd you could use a cotton-silk or 100% silk decor fabric that’s perhaps too pricey for a voluminous gown or skirt, but would make a very pretty pair of stays.
Carefully transfer all the markings (boning channels, cutting lines, etc.) by poking holes with a pin and then using a water-soluble fabric pen along those points. Complete the lines with a quilting ruler. Sew all 8 canvas sections to their corresponding main section.
Here are all the pieces with main fabric and strength layer sewn together and all the boning channels. You can see in the middle I was starting to sew the sections together and I found small binder clips held the bulky layers better than pins. On the right I was testing out the boning to make sure it fit.

Next follow your markings and carefully sew the boning channels. Rococo Atelier’s 18th century stays tutorial was very detailed and especially beneficial to a first-timer like myself. Her tip about starting where the boning channels cross, instead trying to stop exactly at that point, was like a lightbulb going off! American Duchess has a couple posts with video for making this pattern that took the stress out of working with boning for the first time. I definitely watched/read them several times just have the process feel like second nature.

See how tidy the whipstitched seam looks? This will help strengthen the seam and keep it flat under the lining. Something bumpy will be very uncomfortable once you’re laced in tight. This step is not a part of the Simplicity instructions, but I learned how to do this from the American Duchess video.
I used a tapered awl to make small holes at the front lacing marks. At last getting to see what they look like on me! So I laced up the front and I tried on the stays… but they were TOO. BIG.


Those blue dots on the back seam? Those were supposed to be the back lacing grommets! Obviously there is no way these stays would fit with two more pieces of boning and a laced closed back, much less a small gap like I expected.
These photos are from my second fitting after making them one piece—please ignore the odd lacing with blue yarn! Stays should not be worn with a strappy slip over lumpy jeans, but you knew that right? Sorry they’re not very pretty ![]() It gets dark so early now that getting photos with good light requires some planning, and I wanted see what it looked like right away!
It gets dark so early now that getting photos with good light requires some planning, and I wanted see what it looked like right away!

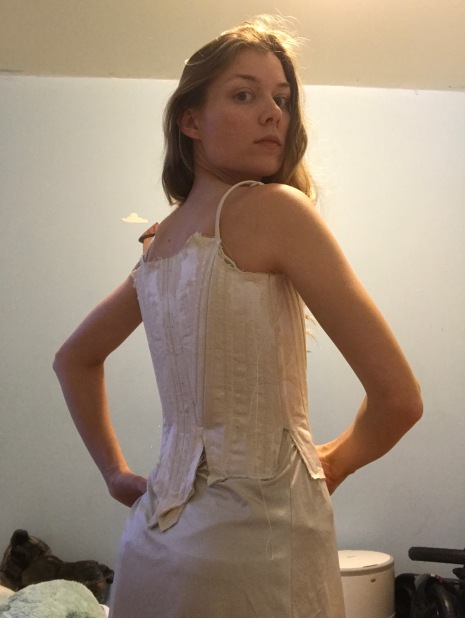
Mistakes conquered! In case any sticklers are concerned the stays do fit properly, but photos with them worn lower are quite indecent and won’t be shared on the internet! 😉 These stays were started at the beginning of October and most of my free time has gone into getting this far so I’m very proud of them. Are you also sewing the SimplicityxAmerican Duchess stays? How have yours come out?
Getting there, but still much to be done! Part II will cover the lining, binding, and grommets.

2 thoughts on “The Stays: Part I”